Before you go ahead with the upgrade or the install Windows 8, you need to check the following System Requirements for Windows 8:
- Processor: 1 gigahertz (GHz) or faster with support for PAE, NX, and SSE2
- RAM: 1 gigabyte (GB) (32-bit) or 2 GB (64-bit)
- Hard disk space: 16 GB (32-bit) or 20 GB (64-bit)
- Graphics card: Microsoft DirectX 9 graphics device with WDDM driver
In case you are wondering why your new Windows 8 installation is failing because of a message that goes:

For your understanding, Physical Address Extension (PAE), NX processor bit (NX), and Streaming SIMD Extensions 2 (SSE2) refer to features of the processor.
PAE = Physical Address Extension enables 32-bit processors to access more than 4 GB of physical memory on capable versions of Windows and is a prerequisite for NX.
NX = No eXecute allows the processor to help guard the PC from attacks by malicious software.
SSE2 = Streaming SIMD Extensions 2 (a standard on processors for a long time) is an instruction set that is increasingly used by third-party apps and drivers. It is required to enhance the reliability of third-party apps and drivers running in Windows 8.
If your PC doesn’t support PAE, NX, and SSE2 you won’t be able to install Windows 8.
Upgrade Assistant will provide you with an error message if:
(1) Your processor doesn’t support PAE and SSE2. In this case, you cannot install Windows 8 unless you do it in unconventional way, perhaps by cloning a Windows 8 install and force run it. Even that may not work.
OR
(2) Your processor DOES support PAE and SSE2, but it is just that your BIOS settings in the PC are turned off. In this case, all is not lost! You can check if your processor supports NX and can turn it on if it is turned off by going into your PC’s BIOS.
Step 1: Accessing the BIOS
Accessing the BIOS can vary depending on your PC manufacturer. Usually, you must press a key (such as F2, F12, Delete, or Esc) or a key combination immediately after you turn on your PC before Windows starts.
An example of a text-based screen with prompt below to access the BIOS settings.
(Press DEL key in this example)
Step 2: Enabling the NX or XD Settings
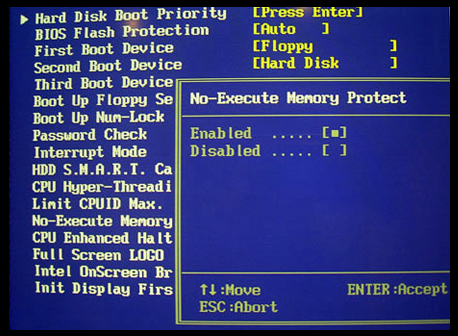
Once you are in the BIOS, look for the NX or XD settings under the Security tab to turn on the NX support. If the BIOS setting for the NX support option is not available on your PC, you might need to contact the PC manufacturer for info on updating the BIOS.
Assuming your BIOS is updated and has the options available, you can do that following:
NX/XD/XN Settings:
Just in case your BIOS call the NX feature in a different way, you can also look for the following names (usually in the security tab/section of your PC’s BIOS):
- NX stands for “No eXecute “. It is a technology used in processors to prevent execution of certain types of code.
- XD stands for “eXecute Disable” an Intel specific implementation of NX. Same feature as NX.
- XN stands for “eXecute Never” and is the ARM equivalent of the same feature.
- Some other BIOS may elaborate it, calling it EDB (Execute Disabled Bit), Execute Disabled Memory Protection, EVP (Enhanced Virus Protection), No Execute Memory Protect or by other names.
 An example of a text-based BIOS settings for the NX/No Execute bits feature.
Go to the setting and turn the setting on. Save the settings in BIOS. Restart the computer.
Step 3: Checking on your CPU’s PAE and SSE2 capabilities
You can check on your CPU’s capabilities by running this little utility from Intel called CoreInfo. You can get it by downloading from Technet. Unzip the CoreInfo.exe from the zip file. Go to command prompt (Run “CMD” in the windows search bar) and run the CoreInfo.exe file.
Once it runs, you will see a lot of information on the screen. Scroll the black command line screen up, and look for the following lines (they are not found together, so you need to pick them up.):
- PAE * Supports > 32-bit physical addresses
- SSE2 * Supports Streaming SIMD Extensions 2
- NX * Supports no-execute page protection
If there is a “*”, that is good news! If there is a “-“, then it means your CPU does not support that feature, and it does not meet the requirements. Let me share mine with you for visualisation’s sake.
Step 4: Last checks (depending on what functionalities you need)
If you step 1 to 3 were successful, you should be able to run Windows 8! Why not give it a try first?
And while you are installing, perhaps you would like to check out additional requirements as advised by Microsoft:
Additional requirements to use certain features:
- To use touch, you need a tablet or a monitor that supports multitouch.
- To access the Windows Store and to download and run apps, you need an active Internet connection and a screen resolution of at least 1024 x 768
- To snap apps, you need a screen resolution of at least 1366 x 768
- Internet access (ISP fees might apply)
- Secure boot requires firmware that supports UEFI v2.3.1 Errata B and has the Microsoft Windows Certification Authority in the UEFI signature database
- Some games and programs might require a graphics card compatible with DirectX 10 or higher for optimal performance
- Microsoft account required for some features
- Watching DVDs requires separate playback software
- Windows Media Center license sold separately
- BitLocker To Go requires a USB flash drive (Windows 8 Pro only)
- BitLocker requires either Trusted Platform Module (TPM) 1.2 or a USB flash drive (Windows 8 Pro only)
- Client Hyper-V requires a 64-bit system with second level address translation (SLAT) capabilities and additional 2 GB of RAM (Windows 8 Pro only)
- A TV tuner is required to play and record live TV in Windows Media Center (Windows 8 Pro Pack and Windows 8 Media Center Pack only)
- Free Internet TV content varies by geography, some content might require additional fees (Windows 8 Pro Pack and Windows 8 Media Center Pack only)


Hello, my CPU is a i3 330M (first generation). I have windows 7 home premium, 32 bit installed.
I had problems to get the windows 10 upgrade notification. Once i got the notification, it says my CPU is not compatible. I check the requirements and my CPU support PAE, NX (it is enabled in the BIOS) and SSE2. But windows 10 upgrade notification keeps saying it is not compatible with my CPU. Do you know what the problem could be?
Hi, I have no idea what’s the problem. This post is more catering to Windows 8 and not Windows 10. You may wish to search other forums for help. All the best to your troubleshooting.
I have an old desktop with Q6600 CPU and got the no NX notification. It is enabled in the BIOS and Coreinfo.exe says it is enabled. I disabled NX in my BIOS, verfied by Coreinfo, and the Win10 upgrade says everything is OK (can also use Win8.1 Upgrade Assistant program to verify upgrade capability). Try disabling your NX and verifying compatibility.
yea the same thing is happening to me, nut its called virus protection for em, and it says its enabled in coreinfo. I have intel pentimum dual core, @ 3.00ghz
[…] euer Rechner auch die Anforderungen erfüllt. Die CPU muss z.B. SSE2, PAE/NX unterstützen (siehe auch hier). Handelt möglichst auch nicht nach dem Motto “wer liest schon die FAQs, die Microsoft […]